How to solve a 4x4 Rubik's Cube
Introduction
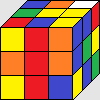
 The 4x4x4 cube is the next puzzle in the Rubik's cube series, known as
the Rubik's Revenge. Although seems to be much more difficult than the famous 3x3, solving the 4x4 Rubik's revenge is very similar to it and requires only few more algorithms to learn.
Learn how to solve a 3x3 cube first
In order to solve the 4x4 cube you will need to know how to solve a 3x3 Rubik's cube first. If you are not familiar with the solution or do not remember it, please go and review the 3x3 solution before you continue. It is best to master the 3x3 solution before going for the 4x4, though it's not a must.Move Notations
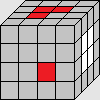
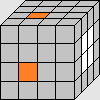
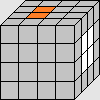
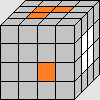
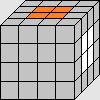
Same move notation rules apply for the 4x4 cube as well, with only 2 differences:1. Lower-case letters mean turning 2 layers of the corresponding face.
2. "2" before the face letter (e.g. 2R) means moving only the internal layer of the corresponding face.
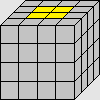
[ r ]
[ 2R ]
Mechanics
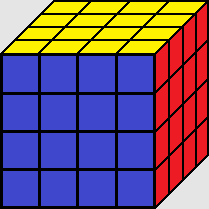
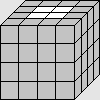
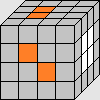
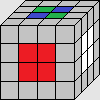
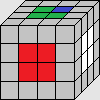
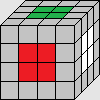
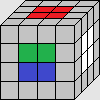
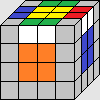
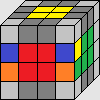
The 4x4 mechanics is a bit different from the classic 3x3 Rubik's cube. There is no single center piece, but 4 center pieces per color; therefore they are not fixed in their positions.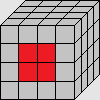 No fixed Center pieces: There are no fixed center pieces in the 4x4 cube, meaning these center pieces can move around the cube, and replace places with each other (unlike the 3x3 where yellow will always remain opposite to white, for example). That means we cannot determine the cube color-scheme by looking at the center pieces (we'll use memory, or corner pieces). As mentioned, there are 4 center pieces for each color. For 4 center pieces solved together we call a center block. (In the image: example of a solved red center block)
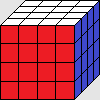
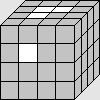
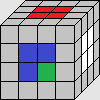
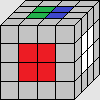
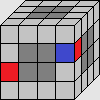
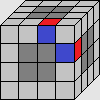
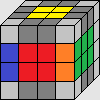
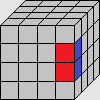 Multiple edge pieces: every edge piece in the 4x4 cube has an identical edge piece around the cube, meaning there are 2 edge pieces of every type (e.g. 2 yellow-red edge pieces). In the 2nd step we are going to pair them up together. For 2 identical edge pieces paired-up together we call an edge block. (In the image: example of a paired red-blue edge block)
The solution
Step 1 Step 2 Step 3 Step 4Step 1: Solving the center pieces
The first step is about completely solving the 6 center blocks, which are 24 pieces in total. We'll start by solving the 1st center block. Good luck!In this guide I chose the yellow color to begin with. Solving the first center block should be fairly easy, as there are no pieces to preserve. Here is how you should approach it: Start by matching 2 center pieces adjacently to each other, and bring the 3rd & 4th pieces to them.
Example: solving the 4th center piece.

Solution:[ r' F r ]
Explanation: by doing an r' move you will bring down the upper-right yellow center piece on the top face into the front face (now it will adjacently match the center piece on front face), then an F move to align both pieces on the right side of the front face, and finally an r move to bring them both upwards into the top face, and form a complete yellow center block.
If the yellow piece on the front face were on a different position in the front face (out of the 4 possible positions), you could just make some F turns to adjust it. Same goes for the top face.
I kept the instructions short for this part, as it's an intuitive part. Just take some time to practice the movements of the 4x4 cube, and you will shortly master the ability to create center blocks intuitively.
The 2nd center block: The second center block to solve needs to be the opposite in color to the previous we've just solved: Since we'd just solve the yellow center block, now we should solve the white center block (This applies only to original color scheme cubes! Where yellow is in opposite to white, red to orange, and blue to green. )
Flip the cube upside down, so the yellow center block will be on bottom. The way to solve the white center block is by repositioning the white center pieces, one by one (or in pairs), into the top face (without harming the solved center block on bottom of course).
Since the only pieces to preserve are the bottom & top centers, you can freely turn: F / B / R / L layers.
The way to "upload" a center piece from a side face (F / B / R / L) into the Upper face is using the following moves:
Example: uploading 2 white center pieces from the F face (same for all faces).
Solution: [ r' F2 r ]
Explanation: since we have to preserve the center pieces at the bottom, just doing an r / l move is not enough. Therefore, we make an r' move and take down the non-white center pieces on top into the F face, then switch them with the 2 white pieces, by doing F2. (There are 2 yellow pieces on the back face at the moment, which will go back into their solved position in the next move). Now we'll finally reverse the r' move by doing an r move. The white pieces are now correctly positioned on the top face, and all yellow pieces on the bottom remained unharmed.
This is an important idea in understanding the 4x4 solution. It's just like an "elevator" move, we bring down the "elevator" toward the pieces we want to reposition, "upload" the pieces into the "elevator", and elevating them upwards into the solved position. That way we are able to position pieces while preserving already solved pieces.
When 3 center pieces are on top:
 Same idea is implemented here: We'll use the elevator idea as well. In fact the algorithm is almost similar-
Solution: [ r' F r ]
The only difference is that we have to make only single F turn, because one white piece was already "inside" the elevator.
If the 3 white pieces on top, or the piece on the front face, are positioned differently than in the example, all you have to do is just some U / F turns to adjust them like in the image and solve.
The 3rd center block: we can choose any of the remaining four colors to be the third block to solve.
In this guide I chose red.
It is best to rotate (flip) the cube so the solved center blocks (yellow & white) will be on the R & L faces.
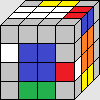
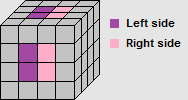 Make some r/r' & U/F/B/D moves to form 2 adjacent red pieces. Rotate (flip) the cube so they will appear on the top face (yellow & white still on R & L faces). Then make some U turns, if needed, in order to align the 2 red center pieces on the left side of the top face(see image for left/right internal side explanations) (can be the right side as well, I'm personally used to left since I'm right-handed), like in the example below (right image):
 Example: forming 2 adjacent red pieces.
Solution: [ U' r U ]
Explanation: we'll make a U' move (so when we'll make the r move, the two red pieces will become adjacent to each other, and not diagonal), then we'll make the r move to pair-up the 2 red center pieces, and finally we'll make a U move to align them both on the left.
Solving the remaining 2 pieces: The best way to do it is by positioning one red center piece on the left side (internal left) of the cube, and the second on the right side, then making an r/r' move to pair them up. In the following example, both of the remaining pieces are on the right side (internal right) of the cube (one is on the top face):

Solution: [ F2 r' F r ]
Explanation: First we'll make an F2 move to reposition one piece into the left side (so the next r' move will not affect it, and it will pair up with the piece currently on top) (The reason we make F2, and not F', is because that in the next move we want them to pair-up adjacently to each other, and not diagonally). Then we'll make the r' move to pair-up the pieces. Now we'll make an F move to align both pieces on the right side of front face. Finally we'll make an r move to solve them into their final position on the top face, so all 4 red center pieces are completely solved.
*This example above applies to all possible cases, as by doing r/r' & F/B/D/U moves you can position the 2 remaining center pieces into the same situation and solve the same way.
The 4th center block: The fourth center block to solve is the opposite in color to the one we've just solved,
meaning the orange (again, applies only to original color-scheme cubes, where the orange is opposite to red).
First we'll flip the cube upside down so the red center will be on the bottom face (yellow & white still on L & R faces). We'll have to bring all the orange center pieces into the top layer. Hopefully some of them are already there.
We'll use the "elevator" principle to upload the orange pieces into the top, without harming the red pieces on the bottom. Here is an example to how it's done:
Solution: [ r' F' r U ]
Explanation: first we'll make the r' move, to take down the "elevator" with the non-orange center pieces on top. Then we'll make an F' move to upload the piece into the elevator (Doing F', and not F2, is just right, in order to match-up adjacently with the orange piece on top). Next we'll make the r move to elevate the elevator back up into the solved position. Finally we'll make a U move to align both pieces on the left side of the center (in order to "free" the elevator for the next 2 pieces).
Solving the remaining 2 center pieces: the best way to solve the remaining 2 pieces is by repositioning 1 piece at a time into the top layer, using the elevator principle:
Solution: [ r' F r ]
(If you forgot, we cannot just make an [r] move, because there are red center pieces to preserve on the bottom)
Explanation: we'll make an r' move (taking down the "elevator"), then we'll make an F move to upload the orange piece into it, finally we'll make an r move to upload the orange center piece into the solved position. (Note: again, using the elevator principle, no red center piece, or yellow/white was harmed).
Now we'll apply again the exact same idea for the last center piece:
Solution: [ F2 r' F r ]
Explanation: First we'll make an F2 move to position the orange piece on the left internal side on the cube (We make F2, and not F, because we want it to adjacently match the other orange piece that will go down the next more). Then we'll make an r' move (taking down the elevator), then an F move to upload both pieces into the "elevator". Finally we'll upload both pieces with an r move, and solve the entire orange center block.
The 5th & 6th center blocks: The last 2 center blocks are solved simultaneously, as by solving 1 color, the other color pieces will automatically end up in the opposite center, which is the only available center left.
Important! These centers can be solved correctly, and incorrectly. Let's choose the green color to find out its correct position (out of the 2 available places to be). According to the original color scheme, when the yellow color is on top, and the red color is on the front face- the green should be on the right.
Flip the cube so the green-to-be face will be on top.
Solving these last 2 centers is easier than its looks, and it is done by doing r2 & U/B moves only.
1) First get 2 adjacent green pieces on the top layer (most probably it's already there), and align them to the left. Here is how to do it:
Position a green center piece on the left side, using some U moves. Make an r2 move, and see whether 2 adjacent green pieces formed on the top face. If so make a U/U' move to align them both on the left side, and make another r2 to reverse and bring everything back to place.
If after doing the first r2 move you have no adjacent green colors, reverse the r2 move, and make some D moves (look at the bottom face to see how many needed), so when you'll make another r2 move again, a green piece will be repositioned into the top and will match-up with the green piece which is already there.
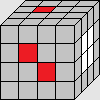
Example: Bottom face looks like: (x rotation)
Solution: [ D' r2 U' r2 ]
In this case, there is no existing green pair on top already (Look only at the left image for notations).
Explanation: first a D/D' move is required so the next r2 move will form an adjacent pair of green centers on the top. Then an r2 move to match-up 2 green pieces together (elevator comes upwards), then a U' move to align both green pieces on the left side ("unloading" from the elevator). Finally an r2 move to reverse all the other pieces back to place (elevator goes back down).
2) Solving the other 2 green pieces into the top face: There are two options here- whether only one piece is on the bottom, or both pieces are on the bottom.
If one piece is on top: the easier case. Align the green center piece on the bottom to the left side of the bottom face (by doing D/D'), in a way that by the next r2 move it will adjacently match with the second green piece. Make an r2 move and match-up the 2 green center pieces. Then just make a D/D' move to align both pieces on the right side of the bottom center. Finally make an r2 move to upload both pieces into the top. All green pieces are solved now, and all blue pieces are on the bottom (All center pieces are solved!)
Example:
Solution: [ D r2 D' r2 ]
If both pieces are on the bottom: there are 2 possible cases- adjacent or diagonal to each other-
Diagonal: [ r2 D/D' r2 ]. Explanation: make an r2 move so one green piece will go upwards into the top layer. Then make a D/D' move to reposition the remaining green piece on the bottom into the second available spot on the left side, so it will adjacently match the second piece currently on top once it will come back down the next move. Now make an r2 move to bring the green piece back down. The green center pieces are now adjacently to each other- Continue according to the adjacent case instructions below.
Adjacent: [ r2 D2 r2 ]. Explanation: align both green pieces into the left side of the center area at the bottom (by doing some D/D' moves), then make an r2 move (elevator principle), Do a D2 move to put both green pieces into the right side (in order to being lifted upwards the next move), and finally reverse the r2 move to bring the green centers into the top face and completely solve the green (& blue!) center block!. (See example below)
Example: Bottom looks like: (x rotation)
Solution: [ D' r2 D2 r2 ]
That’s it! You had solved all 6 center blocks correctly to each other. I recommend you to stop here and practice on solving all center blocks of the 4x4 cube till you feel comfortable in doing so intuitively. It shouldn't be too hard for an experienced 3x3 Rubik's cube solver to do so in a day or two.
Step 2- Pairing-up all edge pieces
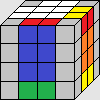
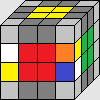
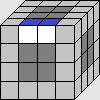 The second step is about pairing-up all the edge pieces with their identical twins on the 4x4 cube, into edge blocks. There are 12 edge-blocks to solve, meaning 24 edge pieces in total. At the image to the right you can see an example of 2 white-blue edge pieces matched-up together into one edge block (a white-blue edge block)
The edge blocks permutations around the cube are completely meaningless at this step.
Solving the first 4 edge blocks:
The way to go here is by pairing-up the edge pieces into blocks and storing them on the top & bottom faces (=8 available places. We'll start with the 4 on top). Remember you are free to make any U/D/B/R/L/F moves you want, as non on them affect the center pieces.
Here is how it's done:
Look for 2 identical edge pieces that are positioned like in the image, then execute the next algorithm:
Algorithm: [ d R U R' d' ]
This algorithm is pairing-up the two edge pieces into a block and storing them on the top face, without harming any center piece. Here's how: by doing a d move, the 2 edge-pieces will pair-up. Then using the R move the formed edge-block will move upwards into the top layer. Next we'll make a U/U'/U2 move to secure the block on the top (so it won't go back down in the next move - R'). We'll do the U/U'/U2 according to the edge blocks on the top, if there are no solved edge-blocks then it doesn't matter. If there are already solved blocks- we want to make sure not to take them down instead. Finally we'll make R' d' to bring back all other pieces into place.
Using this method you'll be able to quickly pair-up and store on top/bottom the first 8 edge-blocks.
How to bring the edge pieces into the case above?
First bring both pieces into the same face using R2/L2/F2/B2 moves and U/D moves. Here is a quick algorithm to move 2 edges into the desired position (see image):
Solution: [ L' U L ]
Using this simple algorithm you'll be able to correctly position 2 edge pieces that are on the same face and has the same color on the mutual face (if not, just make a U' move) into the desired case. Then just perform the corresponding algorithm [ d R U R' d' ] , and both pieces will pair-up and store on the top face.
Using the method above you'll be able to bring all 8 first edge pairs into the simple case position. Start with the easier edges that are already in this position. The less edge pieces will remain, the easier it will get.
If you have any already paired-up edges on the sides of the cube (between the front and right faces for example) just make a simple R/R'/L/L' to put it on the top layer. For paired-up edges on the bottom just make a double move of its side face to bring it into the top face.

 Example: solving the 4th edge block.
 Solution: [ L D' L' ] [ d' L' U L d ]
Explanation: in this example you can see that 3 edge blocks are already formed, and the fourth is split on the F face. In the first 3 moves (first brackets) we move around the edge piece at the bottom into the "ideal" case where they are both on the side faces with different colors on the F face, then just solving it the way discussed above (it's the same algorithm, just on the left side- L instead of R)
Now all 4 edge blocks on top are formed, we'll continue to the next ones:
Solving 5th-8th edge blocks:
Flip the cube upside down so all the paired-up edge pieces will be on the bottom layer. Now just do the same for the next 4 edge pairs, using the same algorithms and ideas shown above. The only difference is that for an already-solved edge block on the side faces: instead of using R move, execute – [R U R'] to upload the edge block into the top layer while preserving the bottom edge blocks.
 Example: solving the 8th pair.
 Solution: [ d' L' U L d ]
(exactly the same way discussed above)
In this example all edge blocks on the bottom are formed, and another 3 on the top face are formed as well. Remaining is only one to solve. It's going to be the red-white in our case (second piece is between the Front & Left faces). It is being solved exactly the same way as shown in the last example.
After solving all 8 edge blocks on the top/bottom faces, continue to the last four:
Solving the last 4 edge blocks:
Solving the last 4 edge blocks is a bit trickier, however very short. Here we want the 2 twin edge pieces to be with the same color in their mutual face (Like in the image below).
The following algorithm solves both edge pairs simultaneously while preserving all other edge blocks & center pieces:
Algorithm: [ d R F' U R' F d' ]
This is an important algorithm; it's an algorithm you'll have to memorize in order to solve the 4x4 cube by heart. Take some time to get it.
Using this algorithm you will solve all 4 last edge pairs.
If the edge pieces don't have the same color on their mutual face, like in the example below, use the following move sequence:
Solution: [ R F' U R' F ]
Explanation: this algorithm will flip the 2 edge pieces between the front & right faces. Now the pieces will match for the case solve above.
If only one edge pair has the same color on the mutual face, while the second pair does not have (or not even the same edge pieces), execute the algorithm anyway! That way you'll solve 1 edge block out of the 4 remained, and continue till all 4 are solved.
That’s it! Now all edge pieces should already be paired up with each other. You might notice the cube looks like a regular 3x3 Rubik's cube, and that's how you are going to solve it now, as explained in the next step instructions.
Step 3- Solving like a 3x3 Rubik's cube (Till last layer)
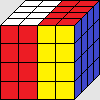
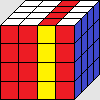
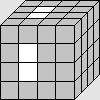
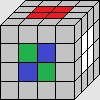
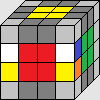
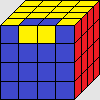
The cube now actually looks similar to a regular 3x3x3 Rubik's cube! Consider the center blocks as a single center piece, and the edge blocks as single edge pieces. =
=
In the images above you can see that the 4x4 pieces are arranged the same as the 3x3 cube.
So from now on just continue and solve the cube like it was a 3x3 Rubik's cube until the last layer (just before orienting the last layer)
The reason to solve only till the last layer, and not complete the cube, is because there are 2 special cases in the 4x4 cube that can occur, which are impossible in the 3x3 cube. They are called parities.
Step 4- Solving the last layer (OLL & PLL parities)
These are the possible cases that can happen during the solution of a 4x4 cube:OLL parity:
[ r U2 x r U2 r U2 r' U2 l U2 r' U2 r U2 r' U2 r' ]
PLL parity:(Top view)

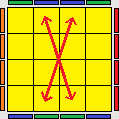
[ 2R2 U2 2R2 u2 2R2 2U2 ]
What is OLL parity?
OLL parity is when only one edge block is not oriented. This is an impossible case in a regular 3x3 cube. This case is solved using the algorithm above. It's important to execute the OLL parity algorithm, if needed, before solving the last layer, because it does not preserve the last layer pieces positions. The probability to encounter an OLL parity during a 4x4 solve is 50%
What is PLL parity?
PLL parity is when only 2 edge pieces are remained unsolved while the rest of the cube is fully solved. This case also cannot happen on a 3x3 cube (reasons below), and is being fixed by the PLL parity algorithm. The PLL parity algorithm does preserve all pieces but the switched edge pieces, and therefore can be used at the end of the solving (after solving all other last layer pieces). The probability to encounter a PLL parity during a 4x4 solve is 50%
Note! You might encounter a weird PLL case, where all pieces are solved but 2 corners for example. That’s because of the PLL parity. After applying the PLL parity algorithm it'll become a solvable PLL case.
Notations explanation: The PLL parity uses an internal layer movement. The number "2" shown before the specified face letter, means moving the internal layer of its face. Example: [2R] = [r R']. The move "2R" can be done by moving both layers by doing r, and then returning the R face back by doing R'. The move "2R2" means moving this internal layer twice. You can see image examples in the intro section above.
Why PLL parity occurs on 4x4 cubes while it's impossible on a regular 3x3 cube?
The reason is because of the mechanics and math of the Rubik's cube. As you know, moving only 2 edge pieces while preserving all other pieces is impossible* (U-perm algorithm affects 3 edge pieces, which is the lowest possible). Moving only one piece is clearly impossible (where will it go without switching with another piece?).
Therefore, a case where only 2 edge pieces needed to be switched is an impossible case on a 3x3 cube. However, on a 4x4 cube it's not really 2 pieces, but 4 pieces, and 4 pieces needed to be switched between is a possible case.
(* At least not by legal moves, the only possible way to do that is by disassembling the 2 pieces by breaking the cube and assembling it wrongly (the cube will become non-solvable)
The same rules apply for all cubes (3x3, 4x4, 5x5, etc..)
What about OLL parities?
OLL parity happens in the 4x4 cube for the same reasons as well. The minimum number of pieces orientation while preserving all other pieces is 2 (applies for all sizes of cubes). Therefore it's impossible that only 1 edge piece will be un-oriented in a 3x3 cube. While in a 4x4 cube it is actually 2 different edge pieces (even though we treat them as "one edge block") which is a possible case.
After understanding the parities, let's continue and finish solving the 4x4 cube:
If after completing step 3 (solving the cube until the last layer) you noticed that an OLL parity occur- then apply the algorithm and continue in solving the last layer using the 3x3 solving technique. Apply a PLL algorithm as well if needed.
That’s it! You had just solved the 4x4 Rubik's Revenge! Just keep and practice on solving the 4x4 cube till you'll be able to do it without using this guide. You will be happy to know that you have to memorize only 4 algorithms for that (2 parities + 2 algorithms from step 2)! Congratulations!
I hope you enjoyed solving the 4x4 Rubik's Revenge cube. You are invited to leave a comment in our facebook page and write about your experience with your solving.
Read my best 4x4 speed cubes guide
Where I review the best 4x4 cubes today, current world records, top cubers choices and where to get them. They are much faster and pleasant for solving and cost usually less than the original rubiks 4x4.