How to Solve a Rubik's Cube, Guide for Beginners
How to Solve a Rubik's Cube | Introduction
The Rubik's cube (sometimes misspelled rubix cube) is a mechanical 3D puzzle, invented more than 30 years ago and still considered as the best-selling toy of all times! Yet, solving the Rubik's Cube is considered a nearly-impossible task, which requires an IQ of 160... Is that really so hard? Definitely not!! Just follow this simple step by step solving guide and you'll shortly find out that you can solve the Rubik's cube as well… Let's get to work!
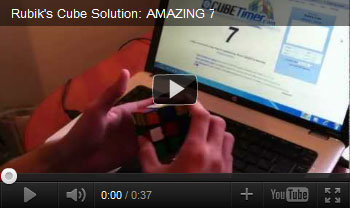
Watch my 7.63s Rubik's Cube solution >>
The mechanism of the Rubik's Cube
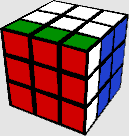
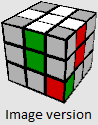
 The Rubik's cube is actually a 26 pieces puzzle. There are three types of pieces: (see image)
Corner piece: has three different color stickers on it (there are 8 corner pieces in the cube)
Edge piece: has two different color stickers on it (there are 12 edge pieces in the cube)
Center piece: has one color sticker on it (6 center pieces, all are attached to the core)
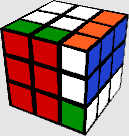
The core is the inside of the Rubik's Cube, which holds all the pieces together and is attached to the center pieces with rotatable axes.
Important! The center pieces are part of the core and subsequently cannot move relatively to each other. For that reason they are already "solved". The solving process is actually bringing all corner and edge pieces to the "already solved" center pieces (meaning there are only 20 pieces to solve out of the 26). For example, the blue center piece will always be opposite to the green center piece (on a standard color-scheme cube). It doesn't matter how hard you will try scrambling the cube, it will just stay that way.
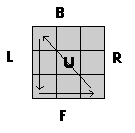
Rubiks Cube Move notations
Move notations are made in order to convey a sequence of moves through writing. When describing the solution we'll use the following move notations (traditional move notations).Here is how it works- every face given a letter:
- F (front): the front face (facing the solver)
- B (back): the back face (opposite to the front face)
- R (right): the right face
- L (left): the left face (opposite to the right face)
- U (up): the upper face
- D (down): the bottom face (opposite to the upper face)
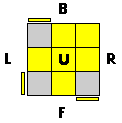
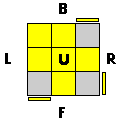
A letter followed by ' (apostrophe) means turning that face 90°, counter-clockwise (single turn). (e.g. R')
A letter followed by "2" means turning that face 180° (double turn). (e.g. R2)
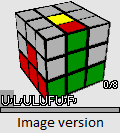
For example: executing [ F R' U2 ] in a row looks that way:
(If you're having difficulty in finding the CW/C-CW direction of a face (like B or D), temporarily twist the cube so that face will become the F face which is the easiest face to determine the cw/ccw direction.)
Don't be worried about it, you'll easily get used to these move notations. Besides, all the algorithms are followed by animations like the one of the last example (only if animations are turned on).
For further explanations and full move notation: Full move notation page.
Now you know everything you need to start and learn how to solve a Rubik's Cube! So, proceed and solve the Rubik's Cube, for good.. Good Luck!
End of Intro.
The Rubik's Cube Solution
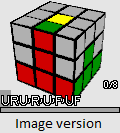
Solving the Rubik's cube is made piece by piece, just like any other puzzle. Therefore the solution is divided into steps each of which solves number of pieces without destroying the ones completed on previous steps. Let's start!Step 1: Solving the edge pieces of the top layer
In this step we have four pieces to solve. First choose a color to begin with. I chose white in this guide. For this time, choose the white as well, so the images along the solution will be relevant to your solving process. In addition, it is best to start with the white/yellow colors as they are the easiest colors for quick recognition which is important for speedsolving.
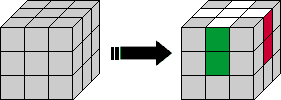
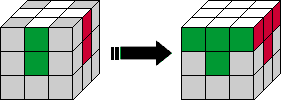
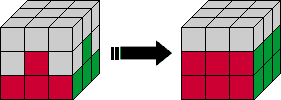
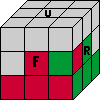
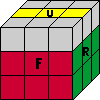
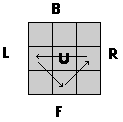
 Since the center pieces cannot be moved relatively to each other it's important to solve the edge pieces correctly in relation to each other. For example, when solving the white in our case- the green center piece is to the left of the red center piece, therefore the green-white edge piece should to be solved to the left of the red-white edge piece (see image).
Remember! Bring the white edge pieces to the white center, and not the white center to the edge pieces.
The following examples cover all possible cases for this step:
(solution is below the image/animation)
[ F2 ]
[ U' R U ]
[ F' U' R U ]
Step 2: Solving the corner pieces of the top layer
In this step we'll solve the four corner pieces of the top layer.
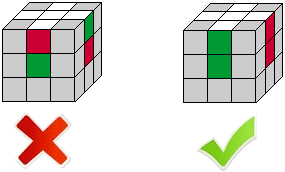
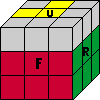
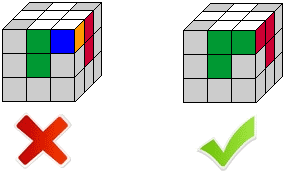 Pay attention! The corner piece has to match not only the white color on top, but also the colors to the left and right (see correct/wrong images).
Inserting a corner piece to its solved position is done this way:
First find an unsolved white corner (at the bottom layer), and position it under the place it should be solved into (by doing D moves). Then continue as follows:
The following examples cover all possible cases for this step:
[ F D F' ]
[ R' D' R ]
[ R' D2 R D R' D' R ]
Repeat that for the other three corners.
Solving a corner that its white sticker is in opposite to the upper face (the third case above), is done in two steps. The first is orienting the corner so the white sticker will show on one of the side faces (done by- R' D2 R D), then Solving using the second case solution (R' D' R).
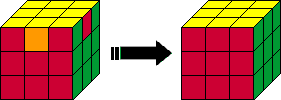
If a white corner piece is located on the top layer but in the wrong place (see wrong image above) or incorrectly oriented in its place, just insert a non-white corner there, and by that the white corner piece will go back to the bottom layer. Then solve it correctly.
Step 3: Solving the edge pieces of the middle layer
In this step we'll solve the four edge pieces of the middle layer, and by that we'll actually complete the first two layers (a.k.a F2L).
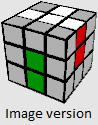
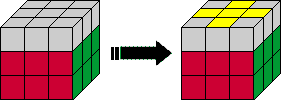
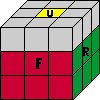
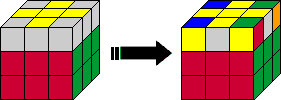
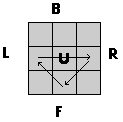
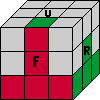 Flip the cube upside down so the solved layer will be on the bottom. Choose an edge piece to begin with which is currently on the top layer, and locate it above the correct center piece to form an upside-down T shape (see image).
In order to insert the edge piece into its position we'll use one of the following algs:
[ U' L' U L U F U' F' ]
[ U R U' R' U' F' U F ]
(These are mirror algorithms which basically does the same. One is for edge pieces which are to the right of the solving position and the second is for those on the left)
Repeat that for the other three edge pieces.
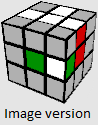
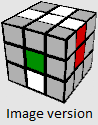
In a case that an edge piece is in its correct position but incorrectly oriented (see image), insert a wrong edge piece to this position, and as a result the wanted edge piece will go back into the top layer. Then solve it correctly using the suitable algorithm.
Step 4: Orienting the last layer edge pieces
In this step, for the first time we won't completely solve the pieces but only orient them correctly. In other words our step goal is to form a cross shape on the upper face of the cube. The edge pieces do not need to fit the colors on the sides.
There are only four possible orientation states:
State 1
State 2
State 3

State 4
In order to complete this step (reaching state 4) we'll use the following algorithm:
[ R' U' F' U F R ]
This algorithm promotes the cube one state ahead each execution.
Meaning that executing this alg once, on state 1 will promote the cube to state 2, and so on. Therefore, we'll have to apply this alg 1-3 times to complete this step. (Animation note: wait for the algorithm to finish before clicking "play" again, remember to turn the upper face twice yourself (U2) before the last execution).
Pay attention! Executing this alg from the correct angle (angle of the cube in your hands) is crucial. For example, in state 3 it's important to execute this alg when the two correctly oriented edge pieces are facing to the back and left faces, and not to the front\right faces.
Step 5: Permuting the last layer corners
In this step our goal is to permute the four last layer corner pieces.
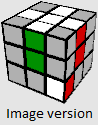
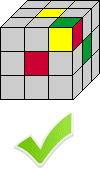
Pay attention! Our goal is only to position the corners in their correct place; we don't have to orient them correctly. For example, take a look at the image to the right; the yellow-green-red corner piece is well permuted.
In this step there are only 2 different possible unsolved states:
- When two well permuted corners are adjacent to each other.
- When two well permuted corners are diagonal to each other.
In order to complete this step we'll use the following algorithm: (Keep reading before executing)
[ L R' U' R U L' U' R' U R ]
This algorithm rotates 3 corner pieces counter-clockwise, and leaves the fourth corner untouched.
If you have 2 adjacent well permuted corners- turn the upper face once clockwise (U). That move will reposition the corners into a situation which only one well permuted corner will remain while the other three corners needed to be rotated counter-clockwise. Now just execute the algorithm above, and by this single execution you actually completed this step (remember to execute this algorithm from the correct angle – when the well permuted corner is on the back right. see algorithm image above).
If you have 2 diagonal well permuted corners- just execute this algorithm above once (the angle doesn't matter), and by that, your cube state will change into a two adjacent well permuted corners state. Then follow the two adjacent corners instructions above.
Step 6: Orienting the last layer corners

In this step our goal is to orient the four corner pieces of the last layer, the ones we have just permuted.
In order to do so we'll use the following algorithms:
[ L U L' U L U2 L' U2 ]
[ R' U' R U' R' U2 R U2 ]
These algorithms actually do the same thing, just in an opposite direction. The first algorithm orients three corners clockwise, while the second orients three corners counter-clockwise. For that reason you can learn only one of them if you prefer (executing one alg twice equals to executing the second once).
If you have only one well oriented corner (like in the alg images), then you are lucky - just execute the suitable alg once and finish this step.
If you have two well oriented corners or no well oriented corners, execute one of these algs randomly from different angles until you'll get only one oriented corner, then just execute the suitable alg one more time to complete this step.
Step 7 (and last!): Permuting the last layer edge pieces
In this step our goal is to permute the last layer edge pieces into their correct position, and by that to completely solve the Rubik's cube.
For that, we'll use the following algorithms:
[ R U' R U R U R U' R' U' R2 ]
[ R2 U R U R' U' R' U' R' U R' ]
Just like the previous step algs, these algorithms actually do the same thing, just in an opposite direction. The first algorithm rotates three edges counter-clockwise, while the second rotates three edges clockwise. For that reason you'll have to learn only one of them if you prefer.
In this step there are only two possible states:
1 correct edge piece, or no correct edge pieces.
(Of-course also- all edge pieces correctly positioned can occur- and that means the cube is already fully solved..:) Congratulations! )
If you have one solved edge piece, then execute the suitable algorithm above and by that actually complete the whole Rubik's Cube!
Congratulations!! You did it! Keep practicing the solution until you'll be able to solve the Rubik's cube without looking at the algorithms (memorize them), I promise you it will happen sooner than you think!
Like us on facebook and tell us about your
solving experience in our facebook page!
For those of you who have a bad, stiff cube:
Read my Buying a Rubik's cube Guide- where I review the best speedcubes in the market, and what world champions are using. World-class cube should cost about 10$/cube, and it definitely worth it!